Projects and Upgrades

Rigging and Bottom Work – Part 5

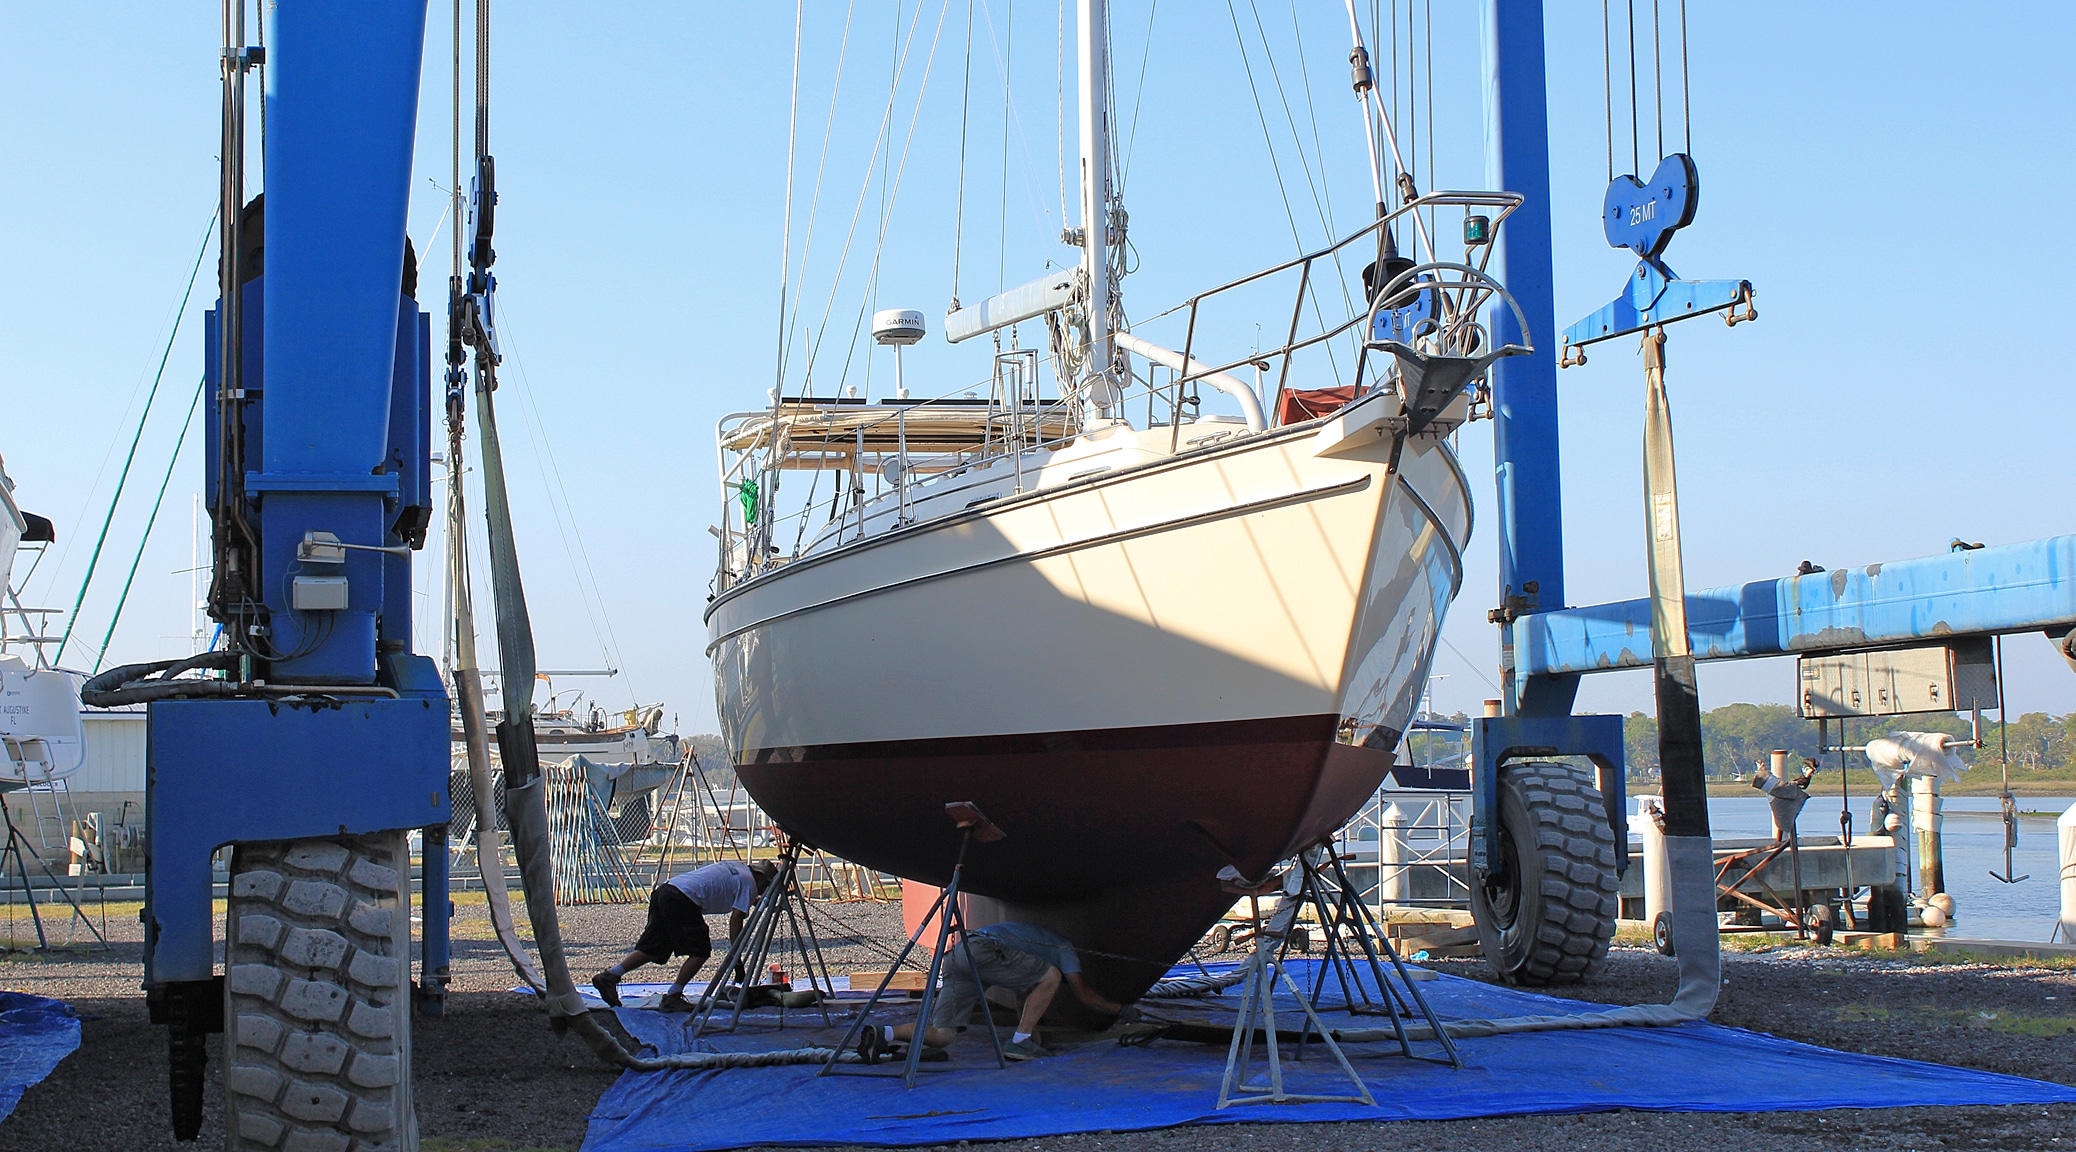
During the three weeks our boat was on land, we took care of a number of other boat projects that are more easily done, or only done, with the boat out of the water. That included two things we didn’t even know we’d have to address until we could see the bottom with our own eyes.

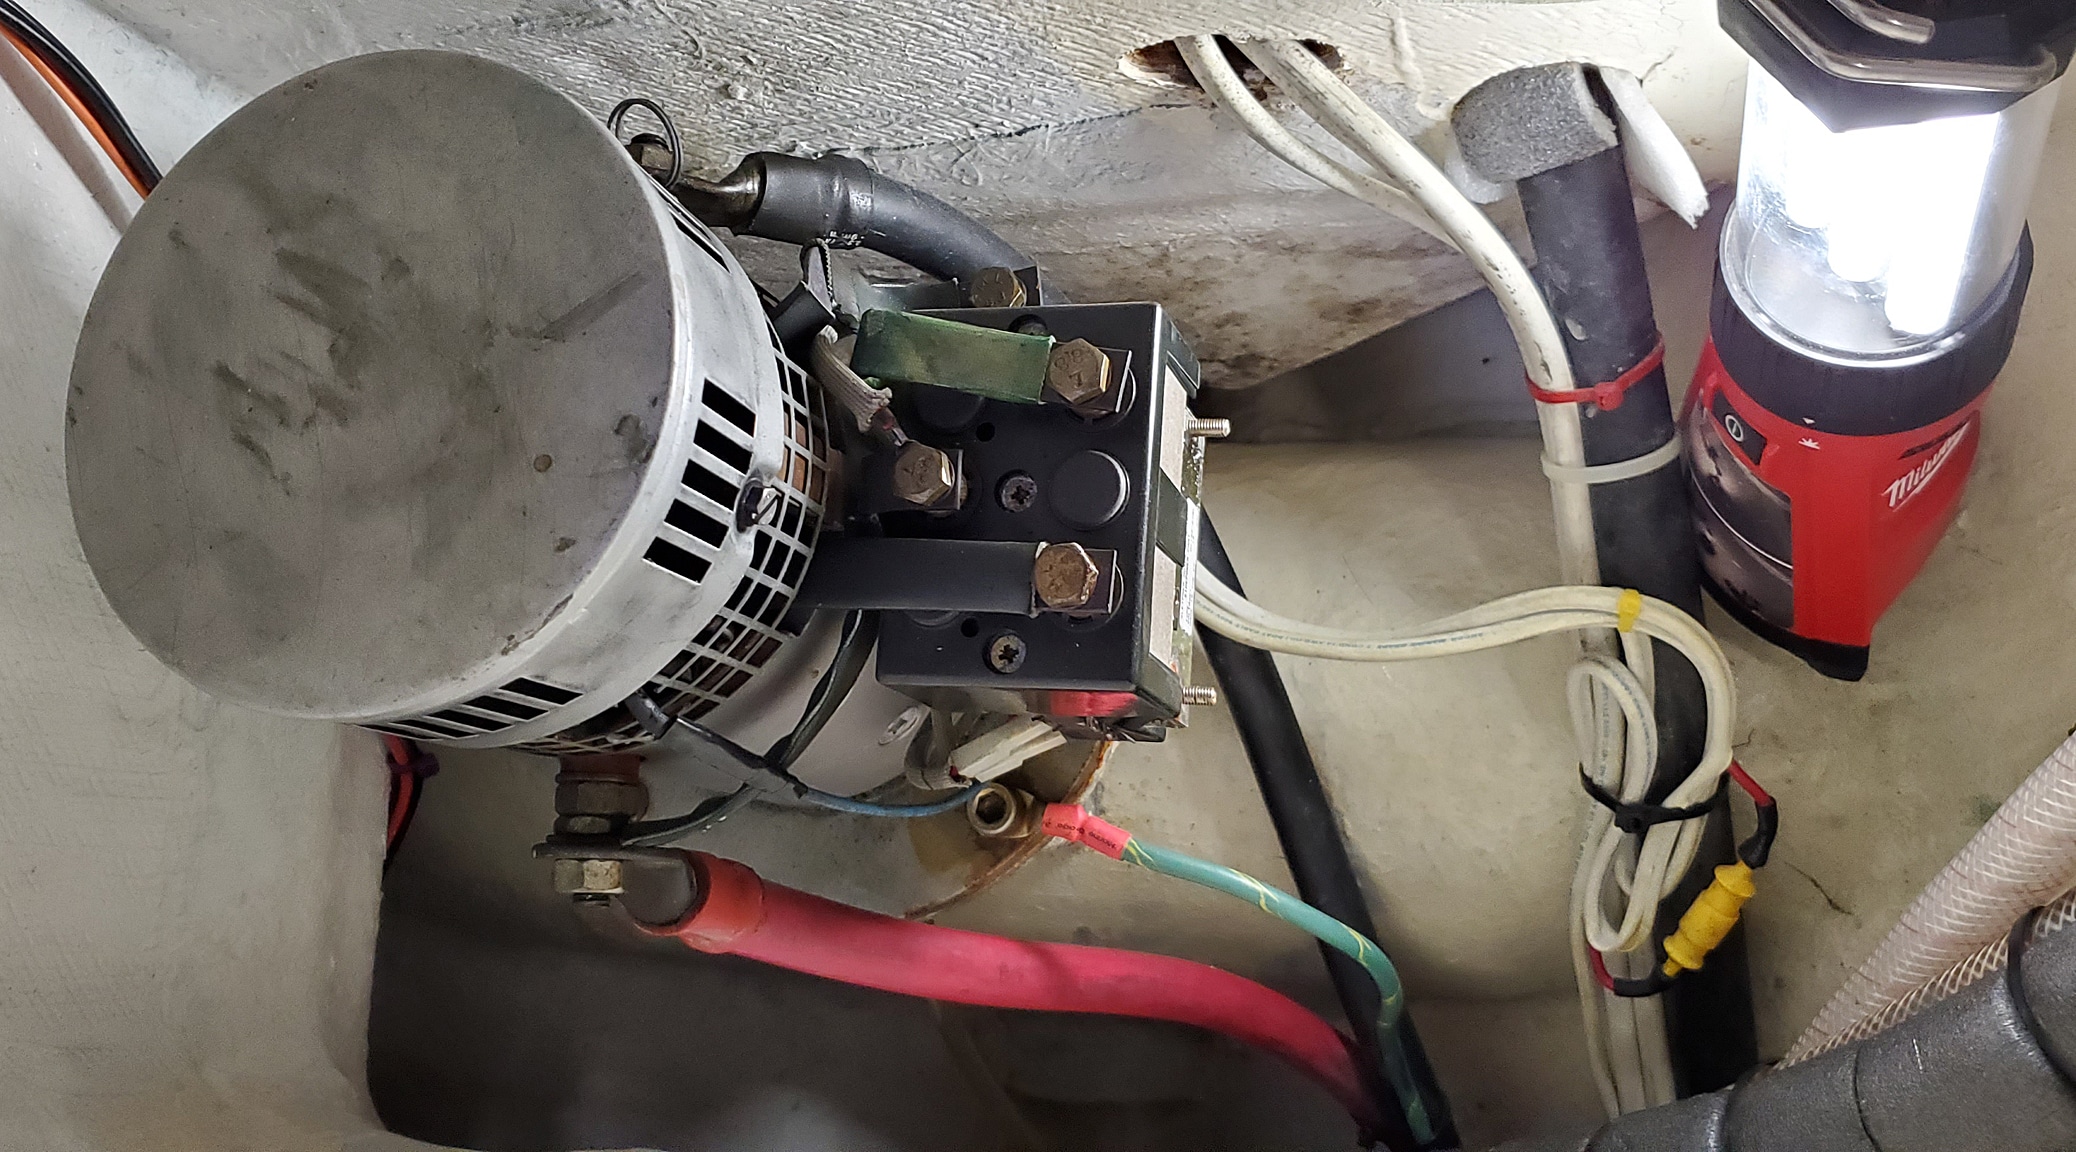
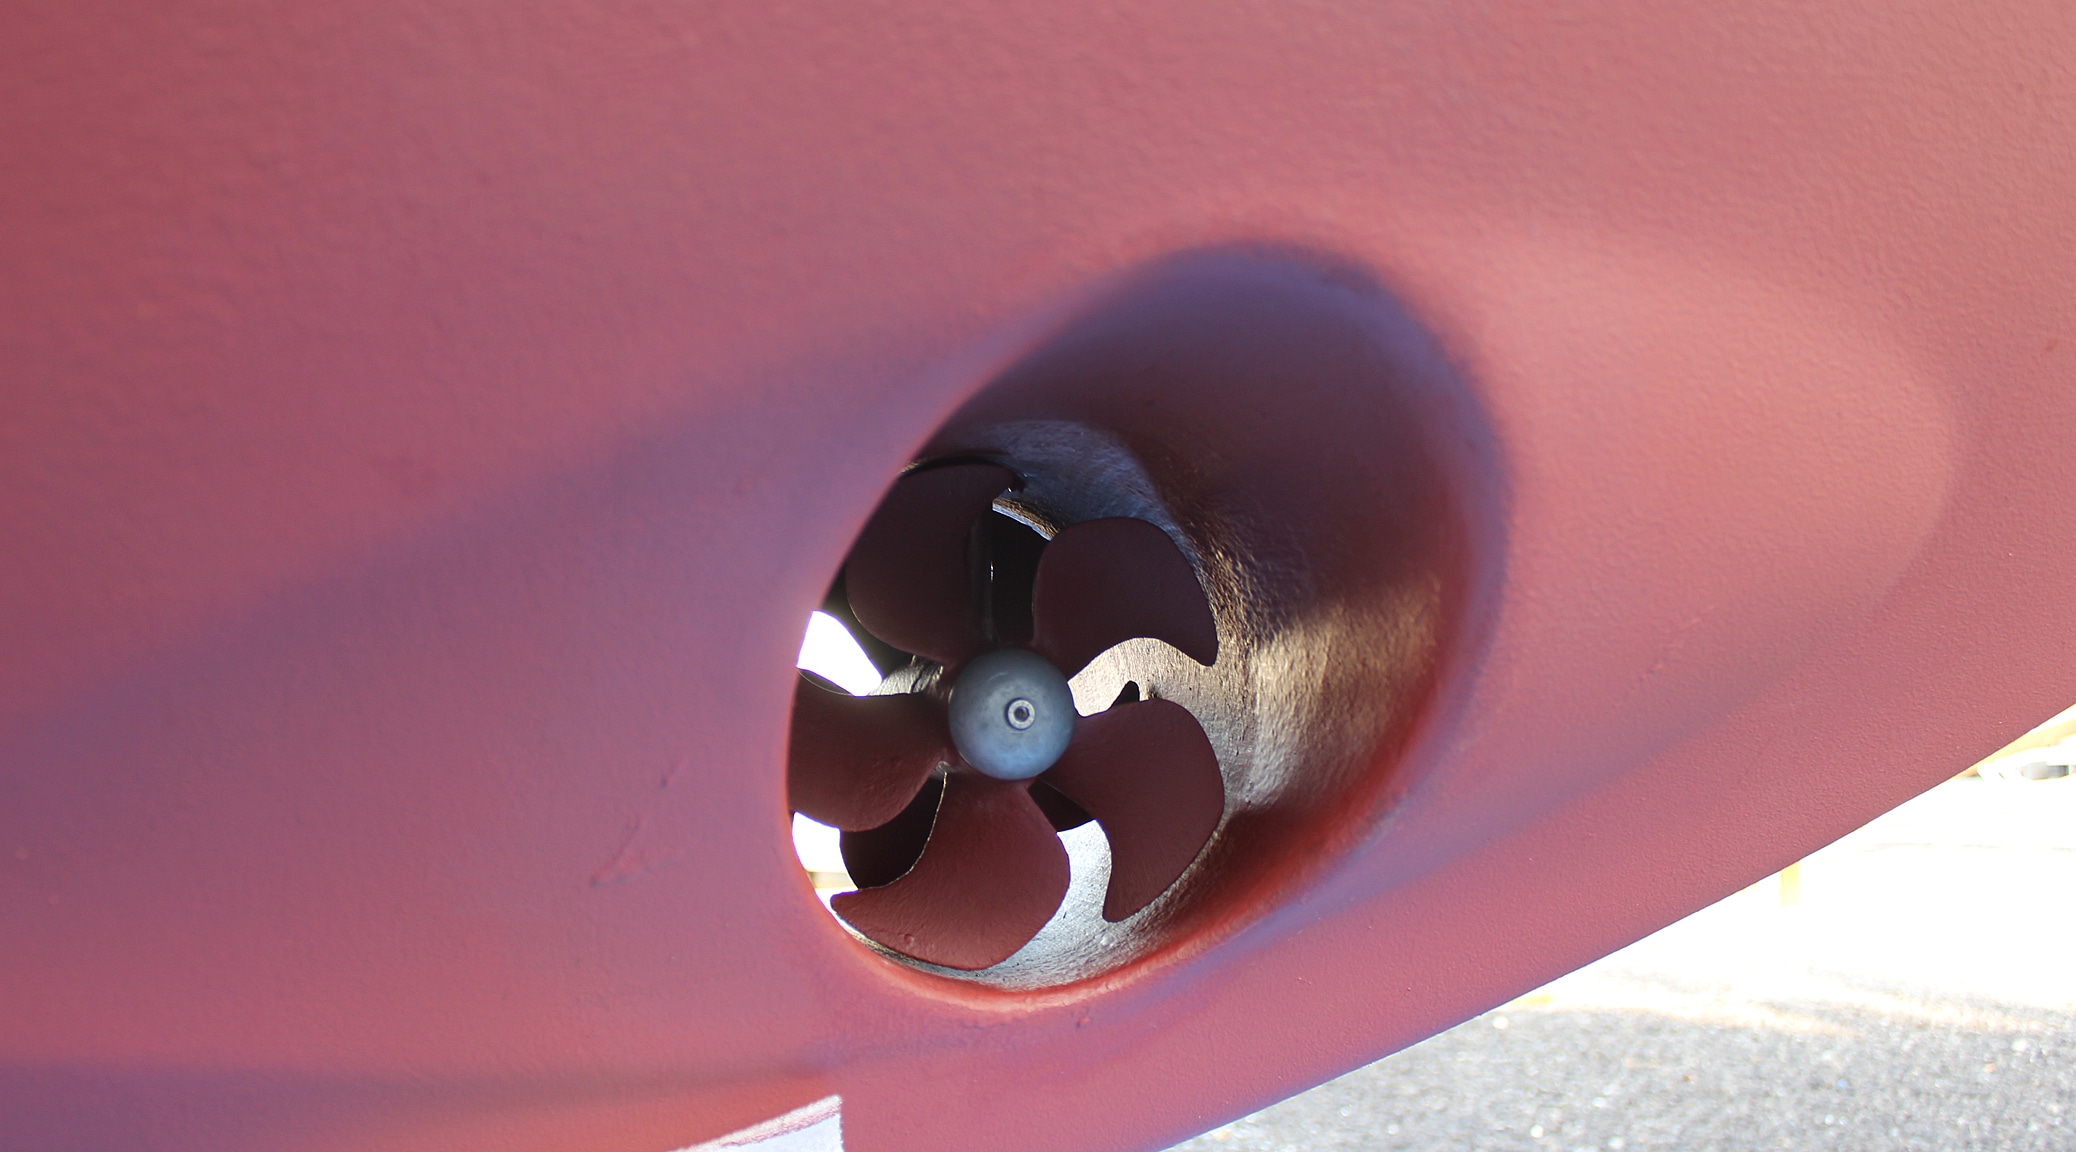
Bow Thruster – The first big thing to investigate was an oil leak coming from the axle on our bow thruster. With the propellers off the thruster and all the barnacles cleaned off the drive leg, we could see the oil leaking from an oil seal on the starboard side. We found new oil seals online for 5$ a piece (we decided to replace the one on the port side as well) and paid for expedited shipping. When the new seals arrived, the first chore was to get the old seals out. This turned out to be nearly an all day job.

Part5-1
Tom trying to remove the old oil seals around the bow thruster axle. In the foreground you can see all the tools we tried using to get the old seals out. When they finally did come out, the new ones went in fairly easily. BUT – once the thruster leg was re-filled with oil, the leak persisted. Same spot, same rate of drip. It turned out to be some deep scoring on the axle that couldn’t be compensated for by the oil seal. We had to order a whole new bow thruster leg (the axles aren’t sold separate). It was costly, but not nearly as bad as we thought it would be.
Part5-2
To get the old thruster leg out, we had to start by disconnecting and removing the thruster motor from the inside of the boat. This is in a tight space in a compartment under our shower in the bow of the boat.
Part5-3
Once all the wires were disconnected, the motor removed, and the two bolts taken out that were holding the thruster leg inside the tunnel, it should have easily come out. It didn’t. No manner of “persuation” made it even budge. The shaft of the thruster leg appeared to be frozen inside the motor mount bracket you can see in the picture (with the rusty surface). The solution was to use a gear puller, the same one we used to get the crankshaft pulley off the engine last fall. It fit perfectly to the thruster motor bracket and worked like a charm.
Part5-4
Here is the truster tunnel with the leg removed. This will likely be the only time we will ever have this particular view.
Part5-5
We received the new thuster leg in plenty of time. We first gave it to the team working on our boat so they could much more easily prepare the metal surface and apply antifouling paint before we installed it in the tunnel. It went in rather easily, the newly painted propellers were attached and new zincs were put on the propeller hubs. Interestingly, the new thruster leg had been redesigned such that it is now a completely sealed unit needing no external oil supply via separate hose and reservoir like we had before. There is no way to get at the oil seals on this new leg as they are encased in the metal housing of the leg itself. Looks like we weren’t the first ones with the leaking problem.

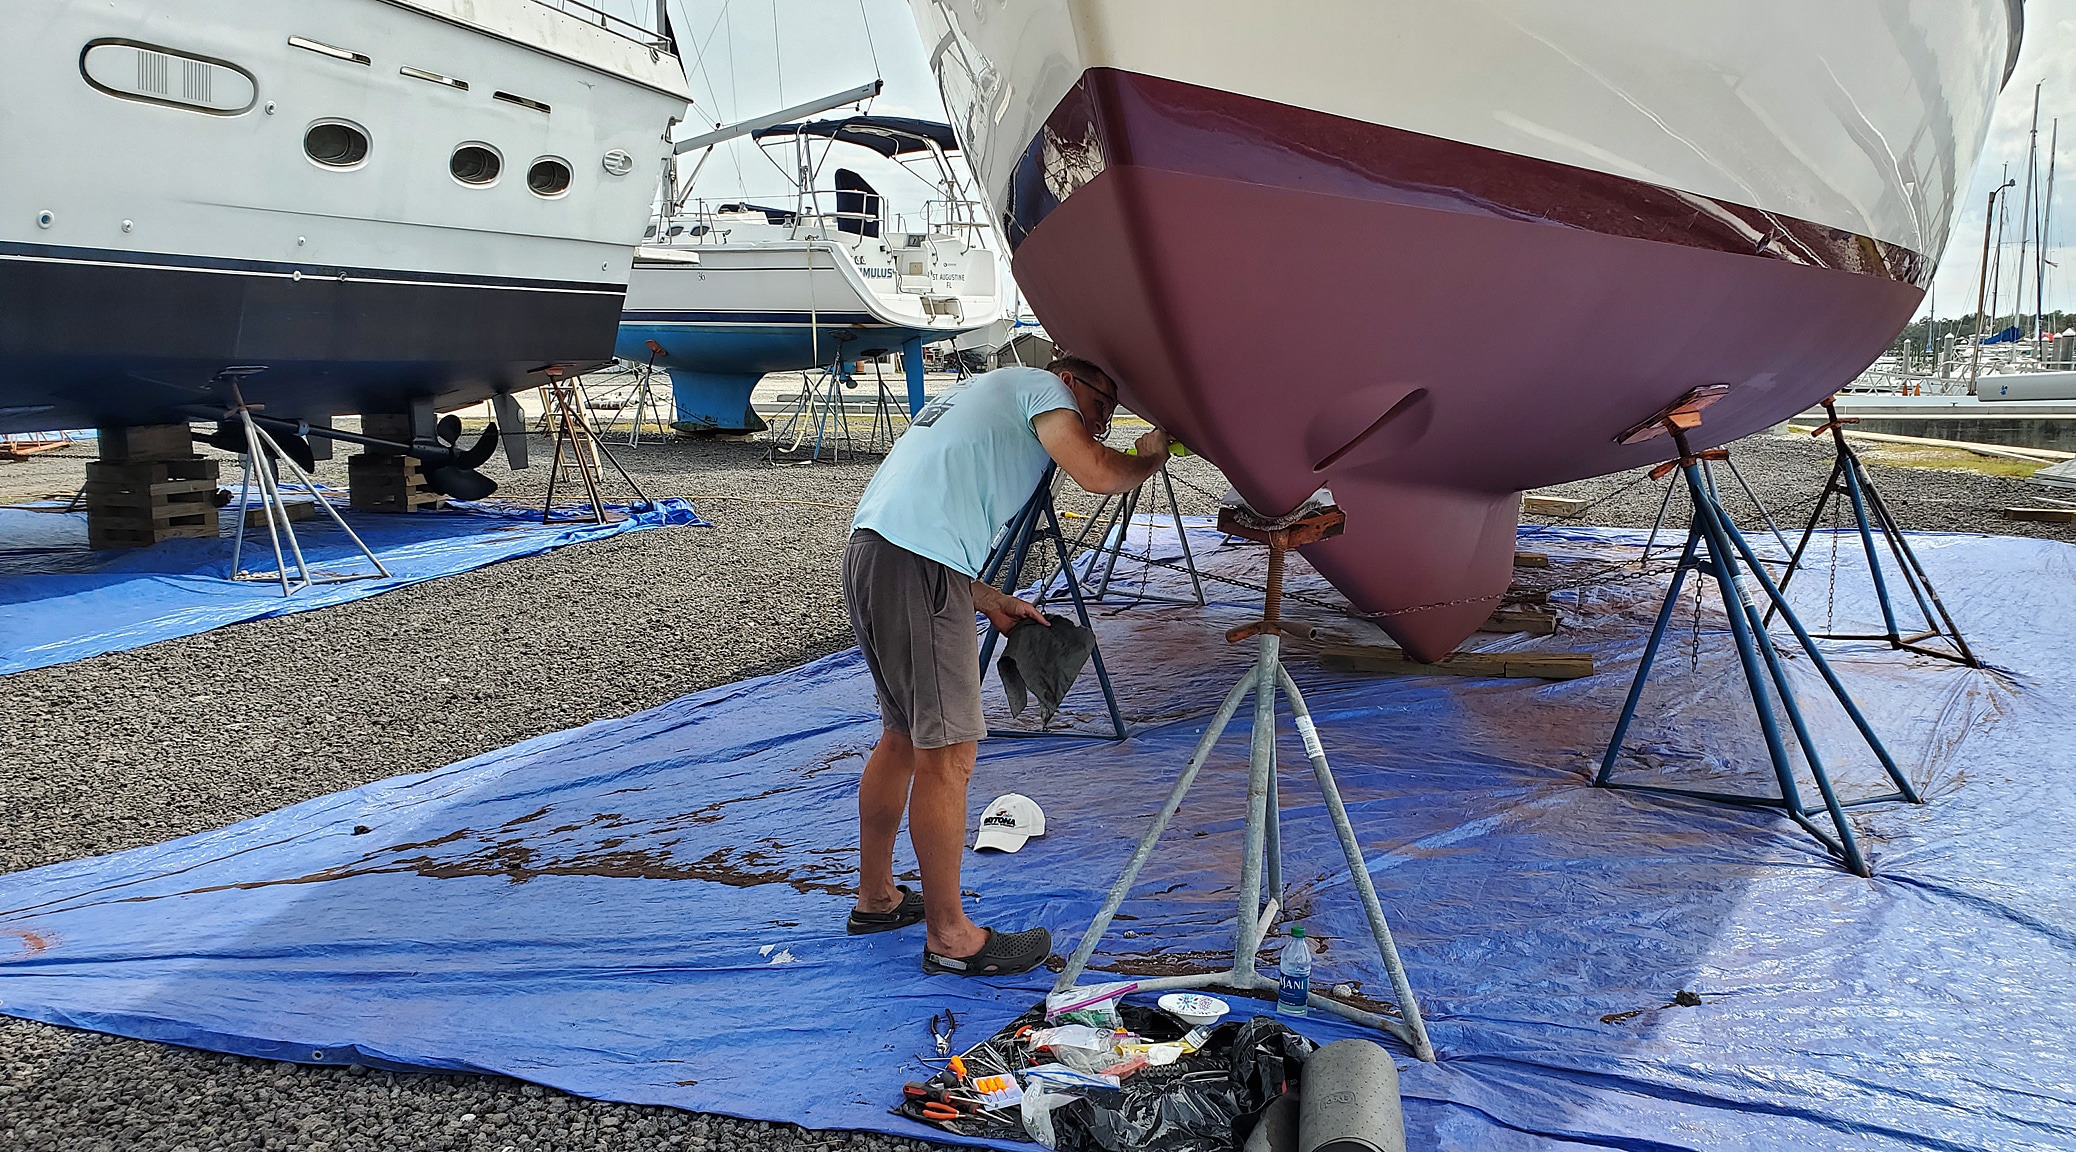
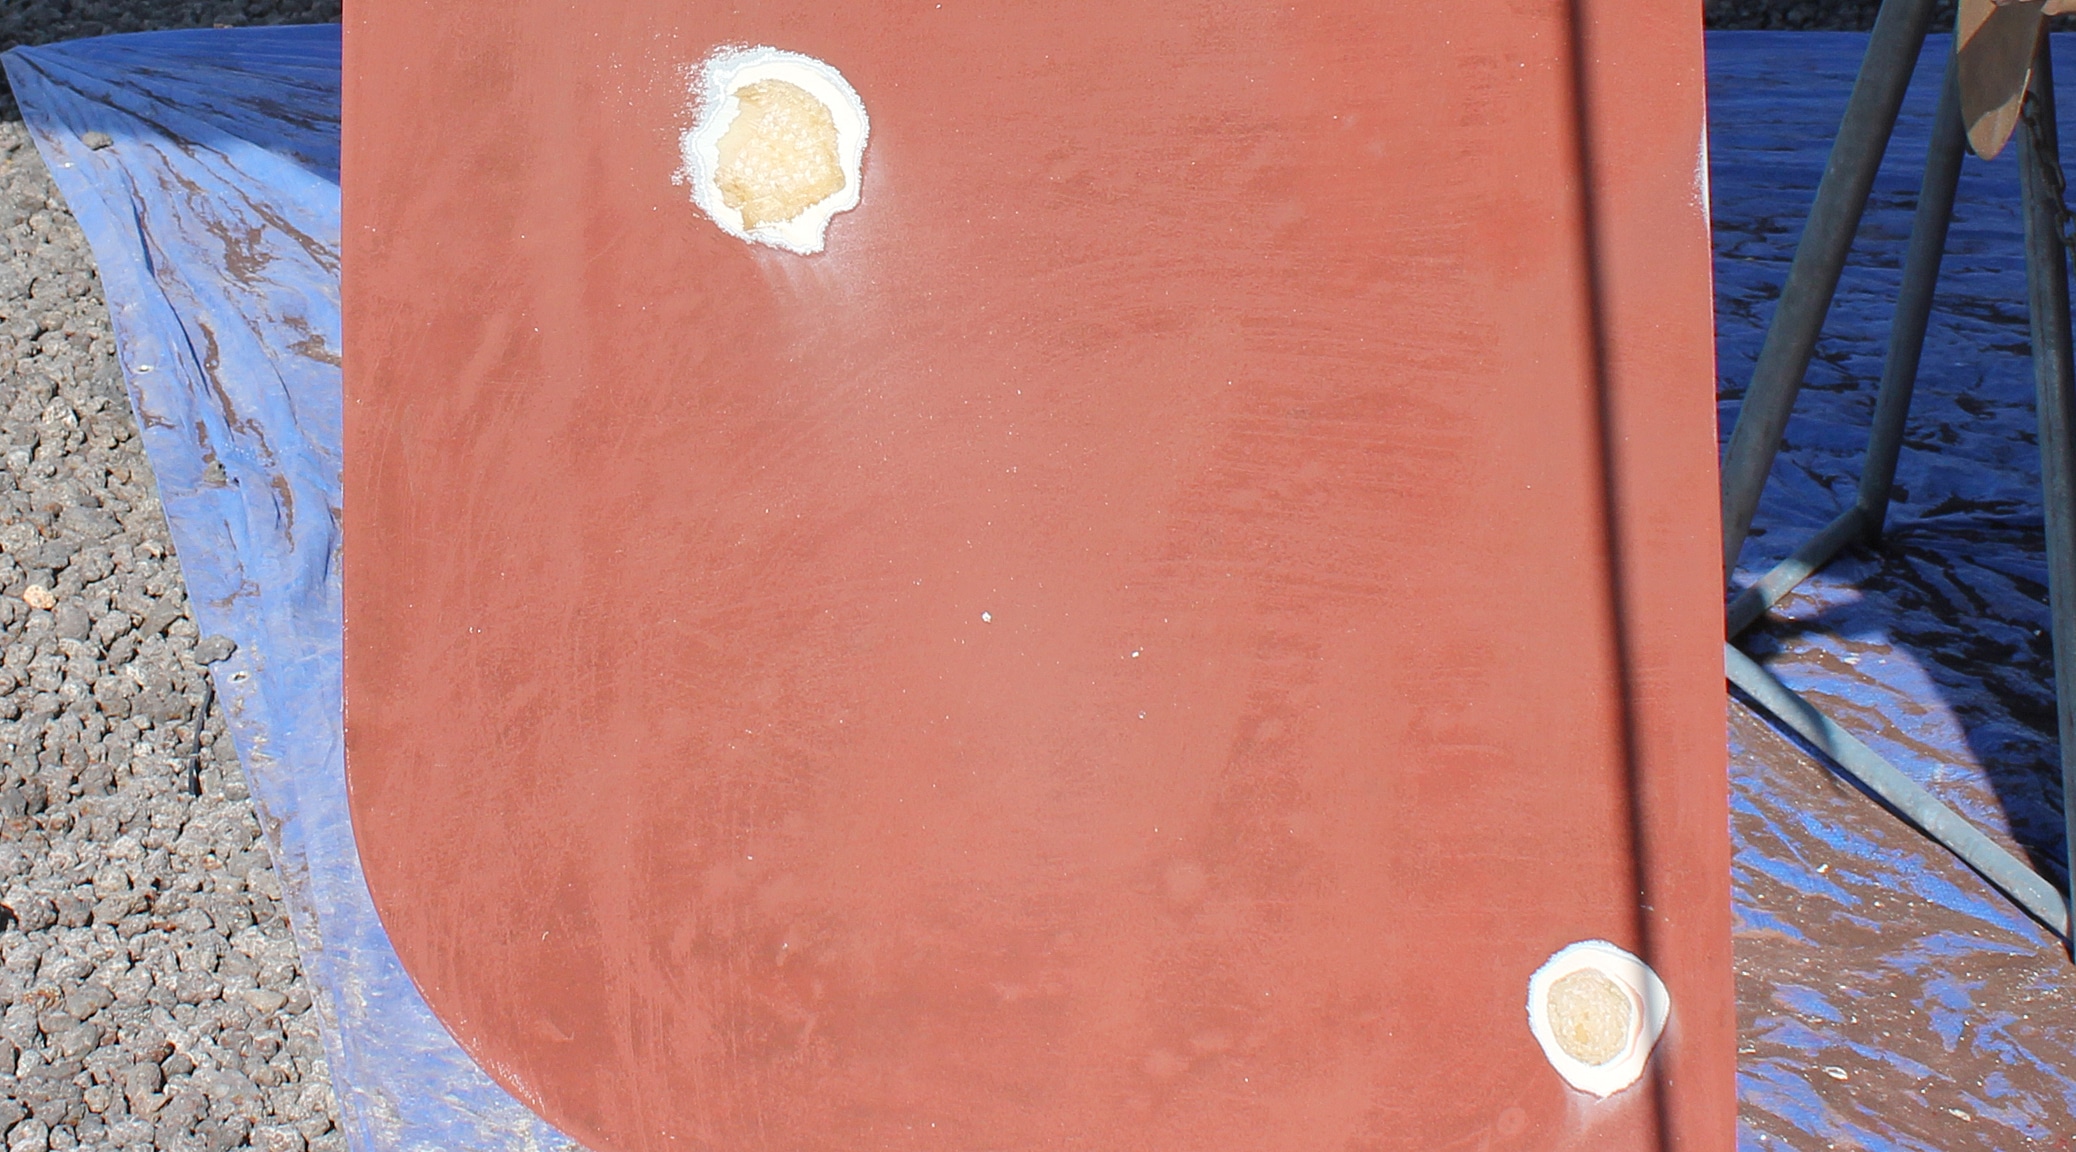
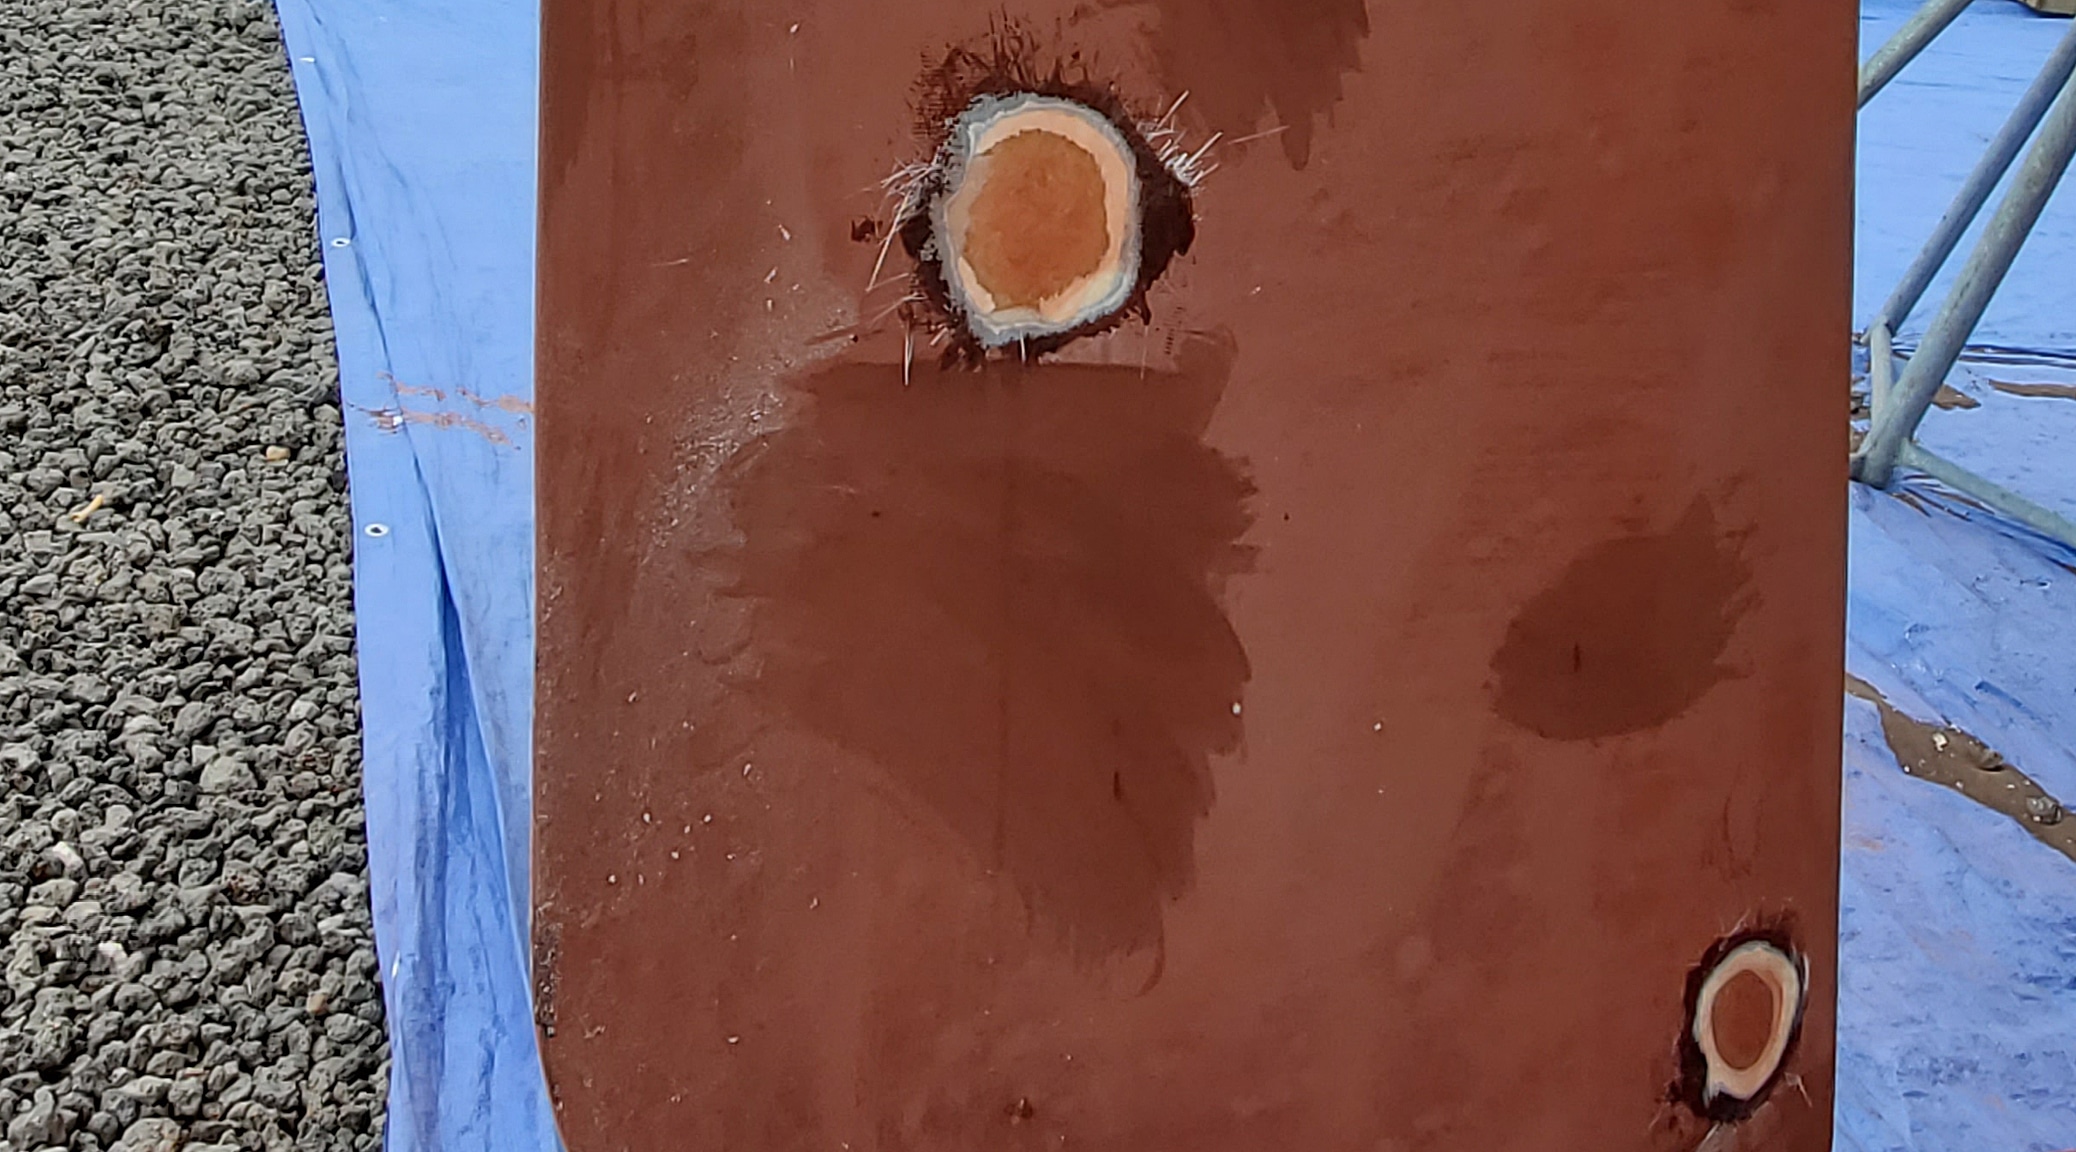
Rudder Blisters – The next problem to attend to were some fiberglass blisters on our rudder. This is a common problem on many sailboats. The rudder on our boat is the only major structural part not made by the boat builder (Island Packet). In our case, which mirrors that of many others, the rudder manufacturer left a number of small air pockets in the fiberglass layup during construction. Some of these pockets filled with water due to osmotic pressure and began to “bubble”, looking very much like a blister on you skin.

Part5-6
The first step in blister repair is to grind out the skin of the blister and surrounding area and let it dry out for a few days.
Part5-7
Next, the ground out cavities are then filled with either an epoxy or new layers of fiberglass mat. In our case, new layers of fiberglass were applied. The white strings you see around the perimeter of each patch are the ends of the fiberglass cloth.
Part5-8
The patches are sanded smooth and prepped. Finally, the rudder is painted like the rest of the bottom. Good as new!

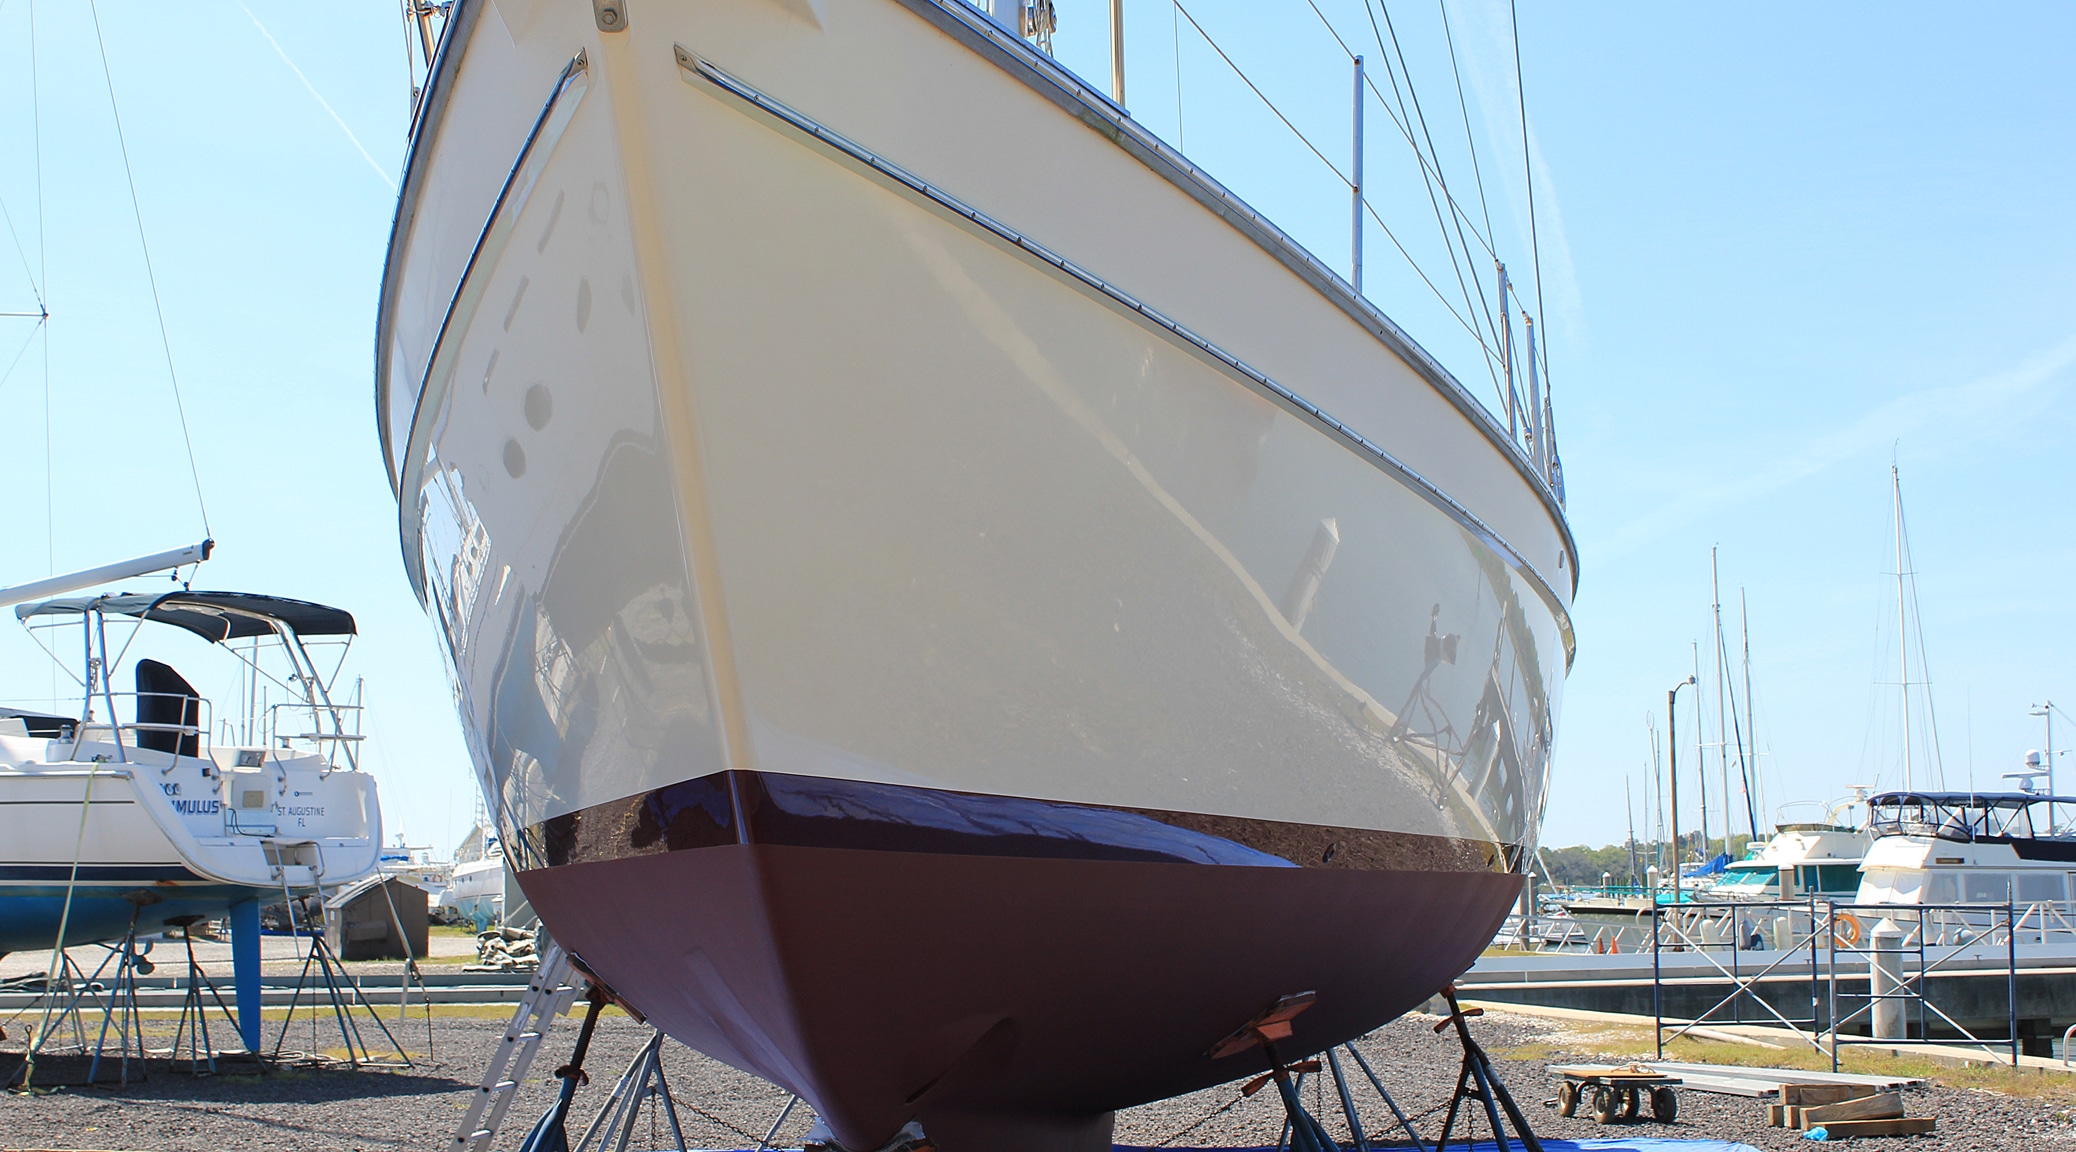
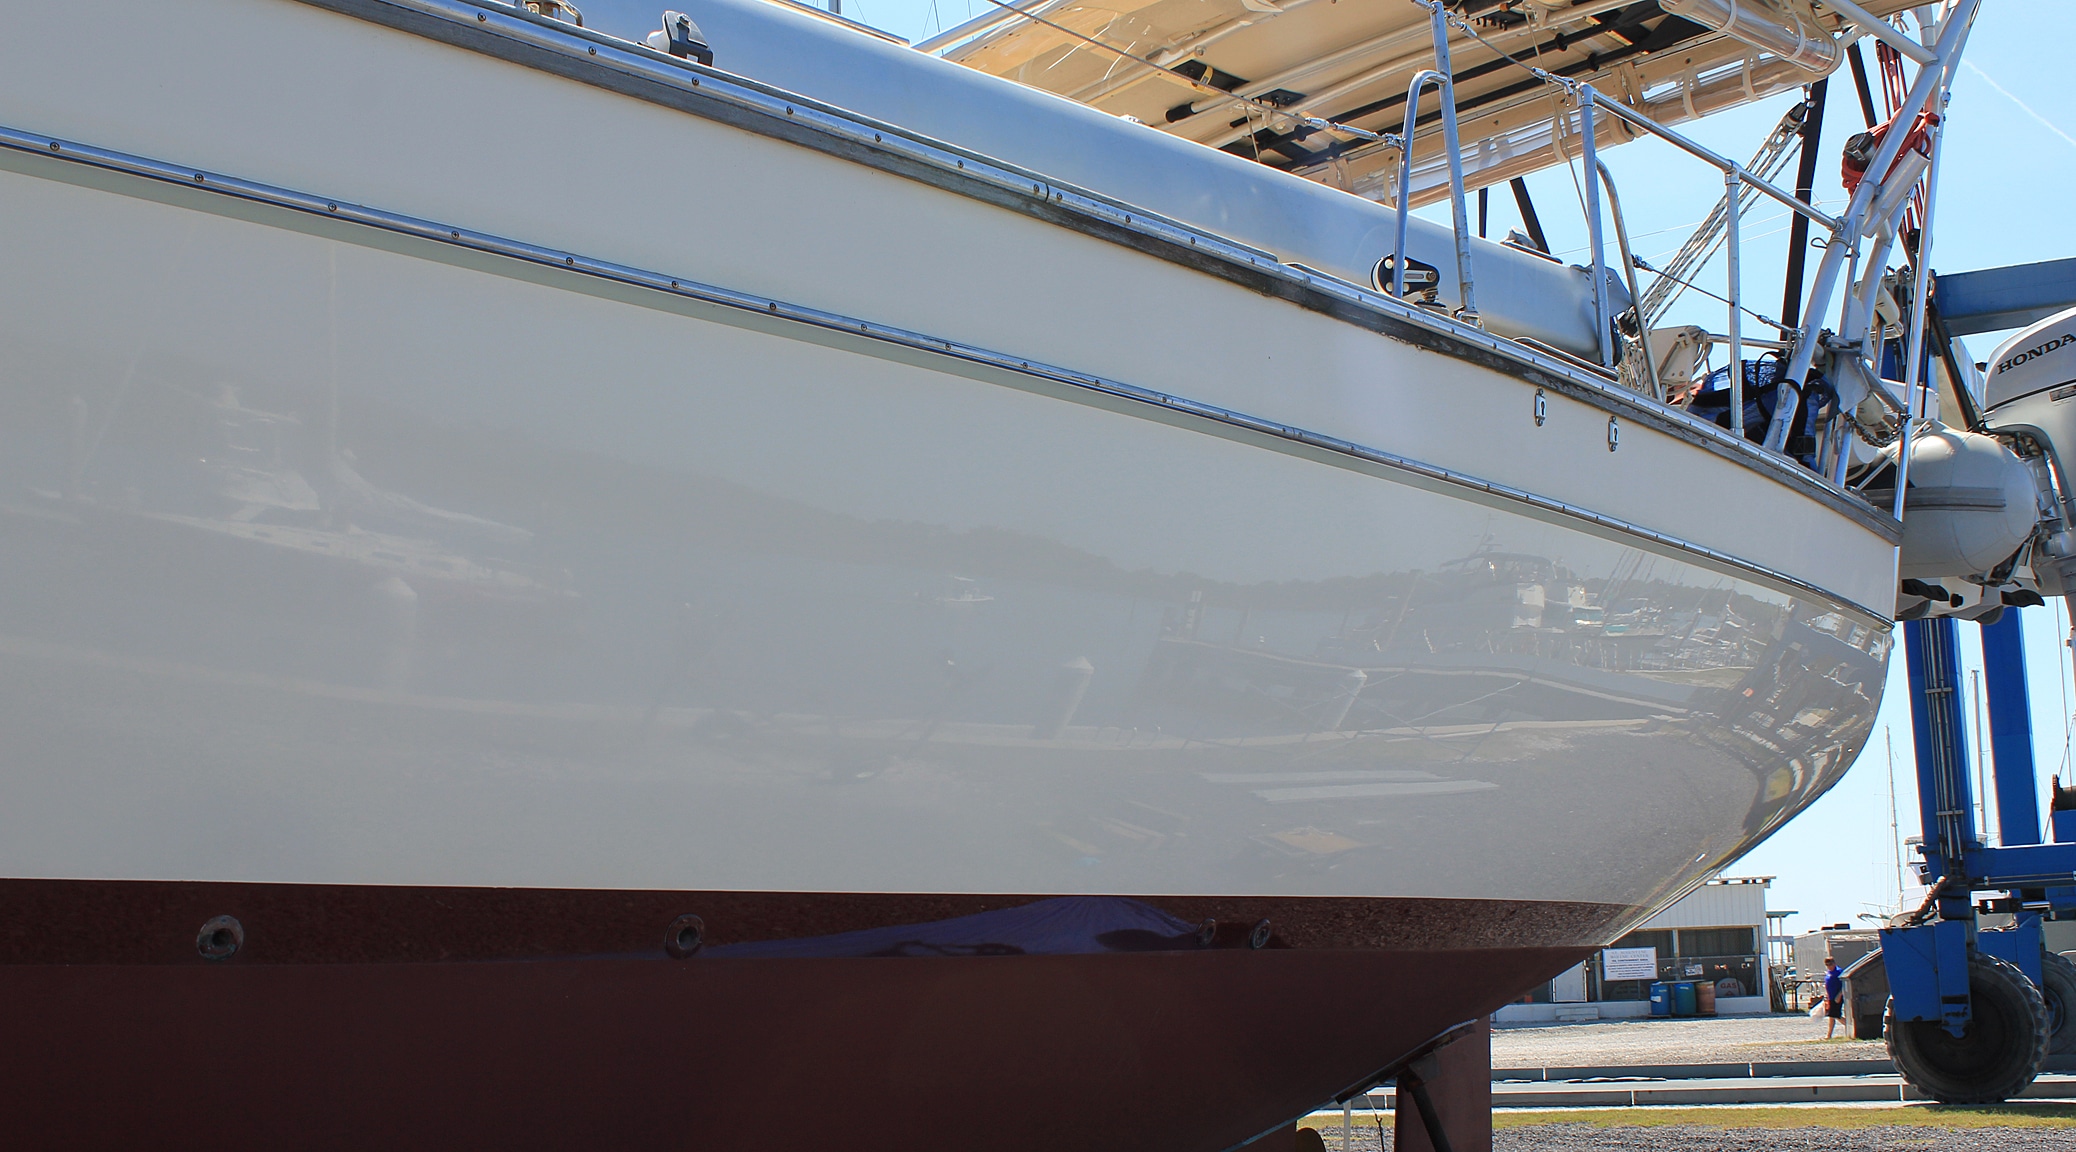
Topsides – The topsides of our hull, the cream color part between the waterline and the deck, is a thin layer of gelcoat over the top of the fiberglass. It is not paint. It tends to oxidize over time and become dull. The easiest time to clean, compound, and wax it is when it is out of the water.

Part5-9
First, we use a polishing compound from 3M and a power buffer to remove the layer of oxidation. This is slow work since you can only do small sections at a time before the polishing compound begins to harden. It took the better part of four days to do the entire hull.
Part5-10
After the polishing, a layer of paste wax was applied to the smooth and shinny surface to protect it. This part went faster but still took a full two days. The result is a gorgeous mirror finish. This side of the boat faces parallel to the river. In the reflection you can see the docks and a few boats passing by.

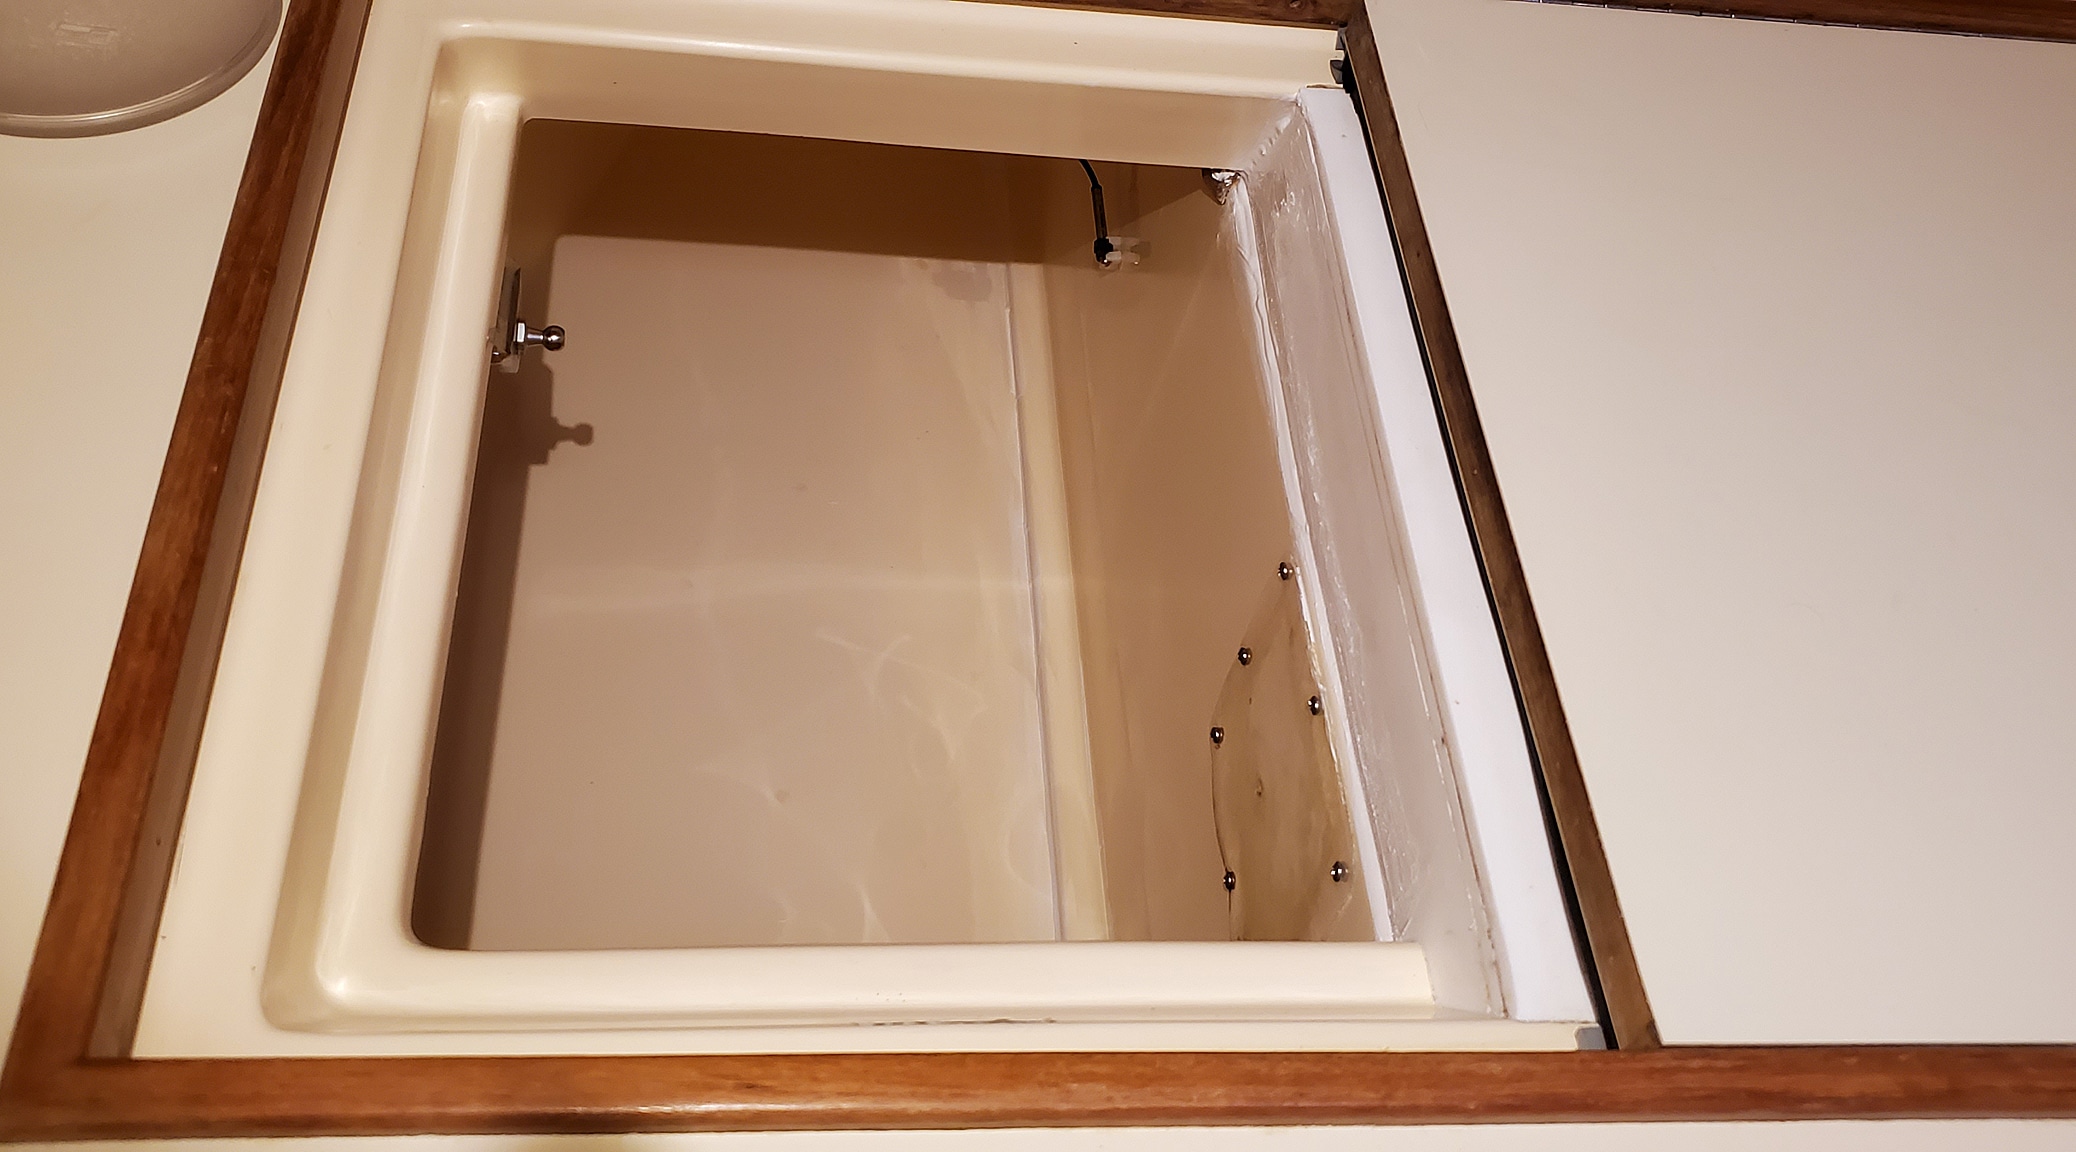
Fridge/Freezer – Our refrigerator and freezer systems work by exchanging the heat they remove with the seawater under the boat. That means they are both inoperative when the boat is out of the water (we had to eat down all our fridge and freezer contents before the haul out). This is the best time to do any maintenance inside the respective boxes since they are thawed out and dry.

Part5-11
One side of the inside of our Fridge box had a caulk seam along part of the partition wall that divides the fridge from the freezer. That caulk was always a nuisance because it kept lifting and peeling in the cold and damp environment. New applications of caulk never lasted very long. We decide to use a more robust epoxy-based seam filler this time around. The first step was to remove all vestiges of the old caulk which is what Paula is doing here. Some of it is really hard to get at because the compartment is so deep.
Part5-12
The problem seam runs along the bottom on the right side of the box. In this picture you can see the white epoxy that has just been applied to that seam. It needs to cure for 24 hours and then sanded smooth. This is not a job easily done when we have a fridge full of groceries that have to be stored somewhere else for a couple days. We also added new gasketing to the fridge and freezer lids while we were at it.

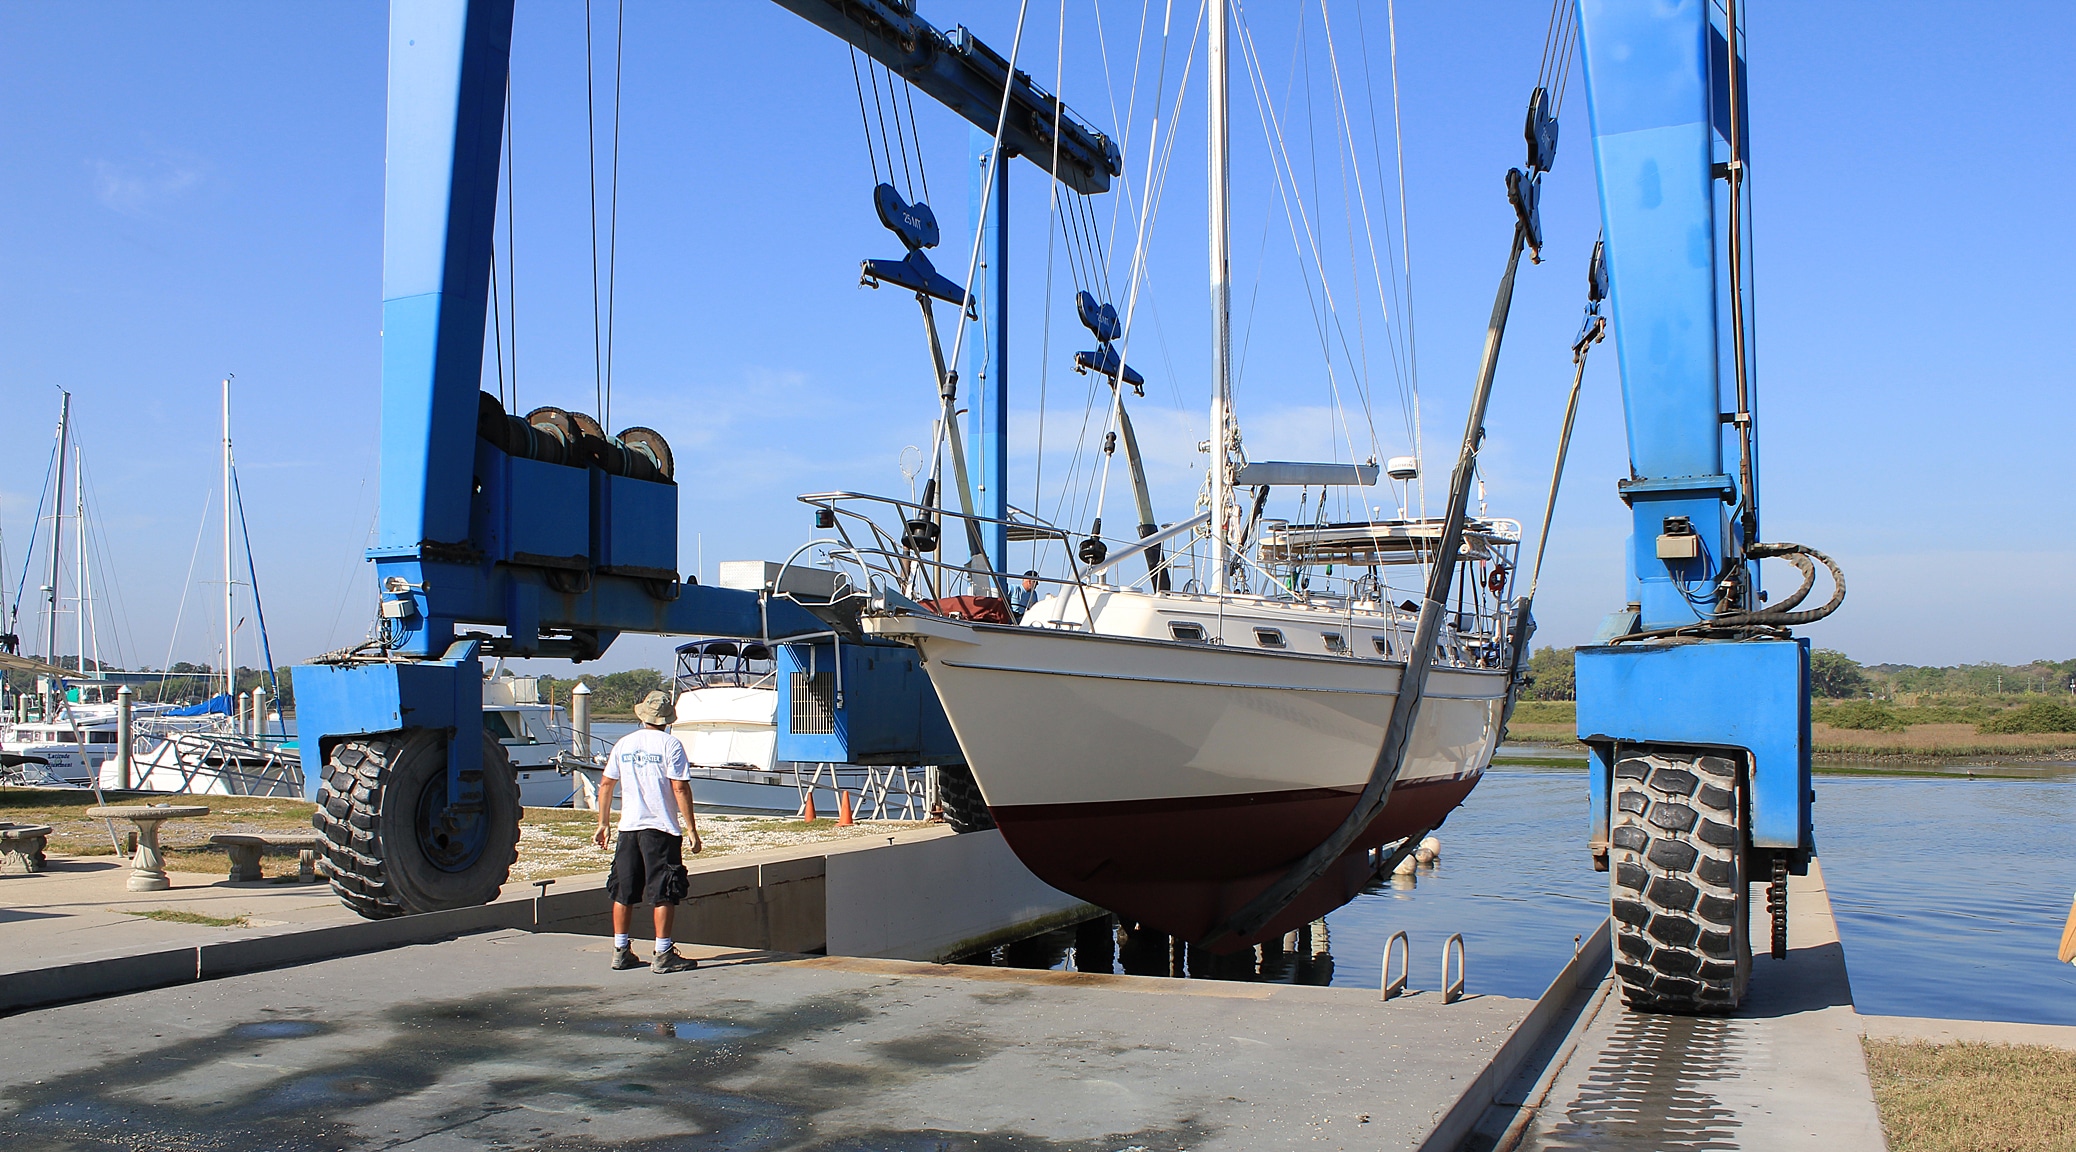
Launching – With the mast back up, new rigging in place, bottom painted, and all our other repair work done, it was time to go back in the water.

Part5-14
Here comes the travel lift approaching the bow of our boat.
Part5-15
Once the travel lift is in place, the big straps from each side are passed under the boat and connected to each other at the middle.
Part5-16
The boat is then lifted up about a foot off the ground so the thin underside of the keel can be painted. If you look close in the middle of this picture (click for a bigger version), you can see a guy laying on the ground with a paint roller doing the job.
The lift then drives the boat on a longish trip around the yard en route to the haul-out slip.
Part5-18
At the haul-out slip, she is carefully lowered back into the water. We then moved the boat to a slip just to the left of the haul-out slip where she sat overnight. Once the boat is resting in the water, it subtly changes shape and puts different stresses on the rigging than when on land. The next day after the boat had “settled”, the rigger came by to do his final tuning of the wires holding up the mast. His team then washed the deck of the boat and we left to return to our home marina 1 mile up the river.

7 Responses

  1. WOW! I just can not get over the fact that both of you were able to take on so many side jobs, unexpectedly identified, along with the ones you already had in mind. Congratulations to both of you along with hugs! Mom C.

  2. There’s an old saying, “You could write a book about it”. This certainly applies to the renewal of C-Ghost. Love, Dad

  3. Thank you both for your always great comments. We love them. Now that we are back in our home slip, there is a lot of “re-assembly” to be done on the boat from things we had to remove before the haul-out. As you may have noticed in all the pictures, most of our canvas was down so it wouldn’t be in the way of the riggers. We re-installed all that yesterday. Of course, all three sails were removed from their furler’s (along with the furling lines) and we will be attempting to put them back on today. We also just re-started both the fridge and freezer and now have to re-stock on food. Everything should be back to normal in another few days.

  4. Awesome… but have to tell you that at first, all I saw was Paula going head first into the freezer and the words “bow thruster”.
    An instant attention grabber ??

    1. Thanks Steve! There is plenty more on the site if you want to see some of the things we’ve been up to over the last four years since retiring. And thanks for the link. I’m always interested in the boating adventures of others, and love the tech stuff. A big part of the fun of this lifestyle for me is the never ending set of interesting engineering challenges. The learning never stops.

Leave a Reply

Your email address will not be published. Required fields are marked *